A homemade glove must, of course, fits like a glove 😉
That’s why below are the step-by-step instructions to adjust the pattern to fit your fingers.
STEP 1: Check finger length

Place the point where your pinky meets your ring finger on the corresponding marking of the palm pattern piece. See illustration.
The pattern piece should still be 0.2 cm longer (excluding seam allowance). If this is not the case, measure how much you need to adjust.
Repeat this for all fingers. Be sure to reposition your hand each time so that the finger you're checking lies straight.
It may seem like your pattern is way too big—don’t worry, that’s normal, since the pattern piece is flat and your hand has volume.
STEP 2: Check thumb length

For the thumb, place the end of your second thumb joint (the knuckle) at the same height as the intersection of line D with line A from the thumb pattern. The pattern piece should be 0.2 cm longer (excluding seam allowance). If this isn’t the case, measure how much needs to be adjusted.
STEP 3: Adjustments
If all lengths are correct, you’re in luck! Otherwise, you’ll need to make some adjustments to the pattern.
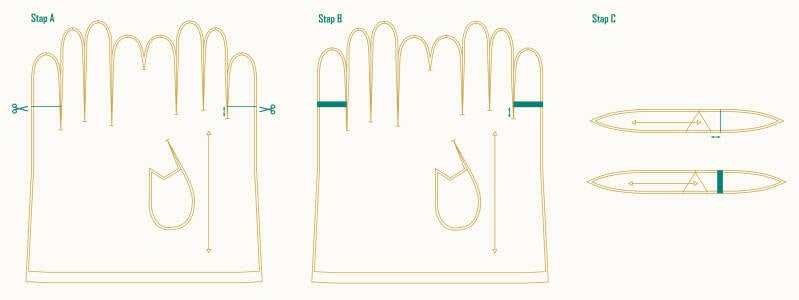
3A: fingers too short
Step A: Draw a support line 1 cm from the endpoint on the palm piece.
Step B: Cut the pattern piece open at the support line, then cut off the finger and add length between (indicated in green below).
Now, do the same for the back piece of the glove. Be careful: the support points are not at the same height, so place the back piece on top of the palm to match the height properly.
Double-check that the adjusted fingers are the same length by laying the back piece on the palm piece.
Recheck the finger length as described in Step 1.
Step C: Adjust the connecting pieces to the correct finger length.
Also, draw a support line 1 cm from the support point (see drawing) and add the same length between.
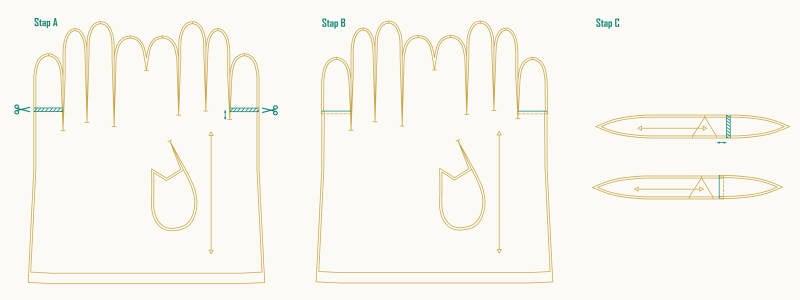
3B: Fingers too long
Step A: Draw a support line 1 cm from the endpoint on the palm piece. Draw a parallel line upwards. The distance between the two lines is the amount you need to shorten.
Step B: Cut the pattern piece open at the lower support line. Cut the finger further off and slide the two pieces over each other. Place the cut edge on the second support line (indicated in green below).
Do the same for the back piece of the glove. Be careful: the support points are not at the same height. Lay the back piece on the palm to match the correct height.
Double-check that the adjusted fingers are the same length by laying the back piece on the palm piece.
Recheck the finger length as described in Step 1.
Step C: Adjust the connecting pieces to the correct finger length.
Draw a support line 1 cm from the support point. Draw a parallel line upwards. The distance between the two lines is the amount you need to shorten (see drawing), and slide the two pieces over each other.
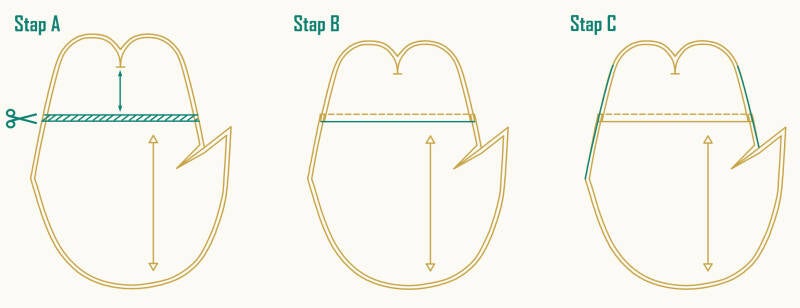
3C: Thumb too short
Draw a support line 2 cm from the middle notch.
Cut the pattern piece open at the support line and add length between (indicated in green below).
The edges D and D’ no longer align, so redraw the line.
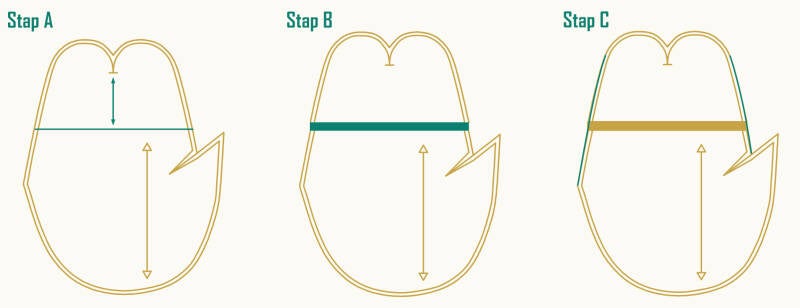
3D: thumb too long
Draw a support line 2 cm from the middle notch.
Draw a parallel line upwards. The distance between the two lines is the amount you need to shorten.
Cut the pattern piece open at the lower support line and slide the two pieces over each other. Place the cut edge on the second support line (indicated in green below).
The edges D and D’ no longer align, so redraw the line.